How To Handle Water Damage in Ceilings
Did you know that 14,000 people in the U.S. experience water damage emergencies at home or work every day?
Ceiling water damage is one of the most common and concerning issues, often resulting from roof leaks, plumbing problems, or severe weather.
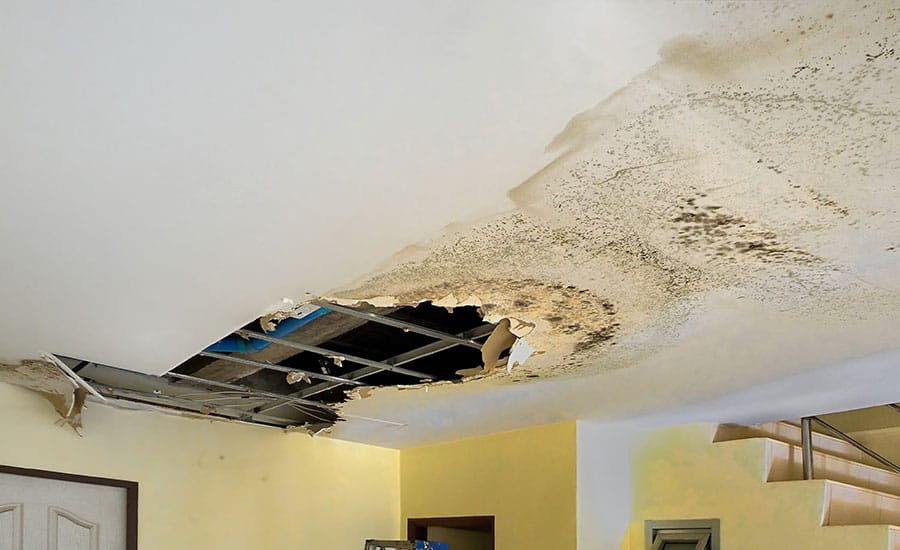
What starts as a small stain can quickly lead to structural damage, costly water damage repairs, and even mold damage that poses health risks. Ignoring the warning signs can escalate the problem, putting your property and safety at greater risk.
In this guide, we’ll walk you through everything you need to know about addressing water damage in ceilings.
Common Signs of Water Damage in Ceilings
Identifying water damage early can save you from costly repairs and structural issues.
Here are the key signs you should watch for:
- Stains and discoloration: Yellow, brown, or rust-colored stains on the ceiling are often the first signs of water leaks.
- Peeling or bubbling paint: Paint or wallpaper that peels or bubbles indicates moisture trapped beneath the surface.
- Sagging ceilings: A sagging or warped ceiling points to prolonged water exposure and possible structural weakening.
- Musty odors: Persistent damp or musty smells can signal hidden water damage or mold growth.
- Dripping water or wet spots: Visible water leaks or damp areas are clear signs of an active problem that needs immediate attention.
- Mold growth: Dark spots or patches on the ceiling often indicate mold, which thrives in moist conditions.
What Causes Ceiling Water Damage?
Ceiling water damage often starts with hidden problems that escalate over time, leading to costly repairs if left unaddressed.
Here are the most common causes:
- Roof leaks: Damaged shingles, flashing, or clogged gutters can allow water to seep through the roof and into your ceiling. Severe weather, such as heavy rain or snow, often exacerbates roof-related water issues.
- Plumbing failures: Burst pipes, leaking supply lines, or faulty fixtures above the ceiling can lead to significant water damage. Hidden leaks in walls or ceilings may go unnoticed until visible signs, such as stains or sagging, appear.
- HVAC system issues: Poorly maintained HVAC units, leaking condensate lines, or improperly installed ductwork can cause water to accumulate and damage ceilings.
- Poor ventilation: Excess humidity in poorly ventilated spaces, such as bathrooms or kitchens, can lead to condensation buildup and water damage over time.
- Ice dams: During winter, ice dams can form along roof edges, preventing melted snow from draining properly.
- Storm damage: High winds, hail, or falling debris during storms can compromise roofing and lead to ceiling water damage.

Step-by-Step Guide To Repairing a Water-Damaged Ceiling
Repairing a water-damaged ceiling requires careful planning and execution to ensure the problem is resolved, and your ceiling is fully restored.
Follow these steps to repair the issue effectively:
Step 1: Assess the Severity of the Damage
A thorough assessment of the severity of the damage ensures all affected areas are addressed, leaving no hidden issues overlooked.
Key steps in this process include:
- Identifying the source of the water and ensuring it is stopped before proceeding with repairs
- Evaluating the extent of the damage by checking for stains, sagging, or mold growth
- Determining whether the ceiling structure is still intact or if sections need to be replaced
Tip: Use a flashlight to inspect for hidden moisture behind the surface. Water stains may not always indicate the full extent of the damage, especially in drywall.
Step 2: Safely Remove Damaged Drywall or Plaster
The safe removal of drywall and plaster must be handled carefully to prevent further damage and ensure safety.
Key tips to keep in mind include:
- Wearing protective gear, such as gloves and goggles, to avoid exposure to debris or mold
- Carefully cutting out and removing damaged drywall or plaster using a utility knife or drywall saw
- Disposing of damaged materials in sealed bags to prevent the spread of contaminants
Tip: When cutting out damaged sections, expand your removal area slightly beyond the visible damage to make sure no compromised materials are left behind.
Step 3: Dry the Area To Prevent Mold Growth
This step is important because you need to remove all moisture from the affected area, creating a stable foundation for repairs.
Key actions during this phase are:
- Use fans, dehumidifiers, or industrial drying equipment to thoroughly dry the affected area
- Eliminate all moisture before proceeding to avoid long-term structural or mold issues
- Monitor the drying process with a moisture meter to ensure the affected area is completely dry
Tip: Position dehumidifiers and fans to create cross-ventilation, accelerating the drying process. For best results, close doors to unaffected rooms to focus airflow.
Step 4: Apply Mold Treatments if Necessary
If mold is detected during the repair process, treating it immediately is crucial to protect your health and prevent it from spreading.
This step typically involves:
- Applying an EPA-approved mold treatment to affected surfaces if mold is present
- Following up with a thorough cleaning to remove all mold residues
- Sealing treated areas with a mold-resistant primer to prevent regrowth
Tip: Use a HEPA vacuum to clean up mold spores after treatment to make sure that no airborne particles remain in the area.
Step 5: Patch and Repaint the Ceiling
Patching and repainting are the final steps to restore your ceiling and blend it seamlessly with the rest of your home.
This process includes:
- Replacing the removed drywall or plaster with new materials, cutting them to fit the damaged area.
- Using joint compound to fill gaps and seams, then sanding for a smooth finish.
- Applying a stain-blocking primer before repainting the ceiling to match the surrounding area.
Tip: Always use a paint roller with an extension pole for a smooth finish and to prevent uneven layers when repainting large ceiling areas.
Tools and Materials Needed for Ceiling Repairs
- Gloves, goggles, mask
- Utility knife or drywall saw
- Fans and dehumidifiers
- Moisture meter
- Mold treatment solution
- Replacement drywall or plaster
- Joint compound and sanding tools
- Stain-blocking primer and ceiling paint

Useful Tips for Preventing Water Damage in Ceilings
Keeping your ceilings safe from water damage requires a combination of regular maintenance and quick action.
Here are the most effective tips:
- Maintain your roof: Inspect for damaged shingles, cracks, and clogged gutters regularly. Keep water flowing away from your home.
- Check plumbing: Look for leaks in pipes and fixtures. Fix any issues quickly to prevent seepage.
- Ensure proper ventilation: Use exhaust fans in bathrooms and kitchens and dehumidifiers to reduce moisture.
- Insulate and protect: Insulate your attic to prevent ice dams and protect pipes from bursting in cold weather.
- Install leak detectors: Use sensors to catch leaks early and act before significant damage occurs.
- Watch for warning signs: Stains, sagging, or peeling paint on ceilings should be addressed immediately.
Contact BELFOR for Expert Ceiling Water Damage Repair Services
At BELFOR, we understand the stress and disruption that water-damaged ceilings can cause. Our professional services are designed to restore your home or business quickly, efficiently, and with minimal inconvenience.
With decades of expertise and advanced technology, we make ceiling water damage repair straightforward and stress-free.
With BELFOR, you can count on:
- 24/7 emergency response: Our team is available around the clock to respond quickly, minimize damage, and restore safety.
- Comprehensive repair solutions: From water removal and drying to structural repairs and finishing, we handle every aspect of the process.
- Expert technicians: Our highly trained professionals use cutting-edge tools and proven techniques to restore your ceiling to its pre-damaged condition.
- Health and safety priority: We ensure your property is free from moisture, mold, and other hazards, safeguarding your space for your family or team.
- Insurance support: We work directly with your insurance provider to document damage and simplify the claims process, easing your burden.
- Preventive recommendations: After repairs, we provide guidance to help you prevent future water damage and protect your property.
With BELFOR, you’re not just repairing your ceiling — you’re restoring your peace of mind.
Contact us today to learn how we can help with expert ceiling water damage repair services. We’re here and ready to assist you, 24/7.
.jpg)


